日历控件基本上所有的前端都会用到,而且我相信8成的JSer都是直接把开源的组件拿来用,很多设计师似乎跟开发们也有默契,对日历控件只要能用就行,样式啥的不做太多要求,但是某些设计师就是有强迫症,一定要你按着TA的设计来,保不准产品也要舔一把火,往日历里塞些稀奇古怪的业务,咋办?初级开发可能就去网上找符合要求的控件,然后拼命说服他们;普通的开发就可能直接在已有的控件上修修补补,除了问题再回炉重造;高级的开发直接怼回去:什么J8需求,不接!顶级的程序员呢?当然是一言不合直接造轮子啊(笑。
先放最终效果,审美有限,将就着看吧~
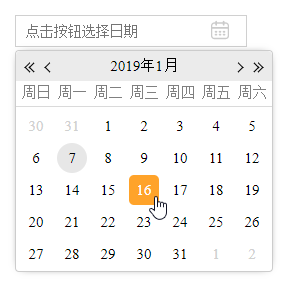
先不管js或是jquery怎么写,咱先把日历的样子搭出来
html:
1
2
3
4
5
6
7
8
9
10
11
12
13
14
15
16
17
18
19
20
21
22
23
24
25
26
27
28
29
30
31
32
33
34
35
36
37
38
39
40
41
42
43
44
45
46
47
48
49
50
51
52
53
54
55
56
57
58
59
60
61
62
63
64
65
66
67
68
69
70
71
72
73
74
75
76
77
78
79
80
81
82
83
| <div id="application">
<div class="date-picker-group">
<input type="text" placeholder="点击按钮选择日期" readonly/>
<i class="trigger"></i>
</div>
<div id="_date-picker" class="calendar-panel" style="left: 120px; top: 135px; display: block;">
<div class="panel-header">
<i class="btn-control prev-year" title="上一年"></i>
<i class="btn-control prev-month" title="上一月"></i>
<span class="YY-MM">2019年1月</span>
<i class="btn-control next-year" title="下一年"></i>
<i class="btn-control next-month" title="下一月"></i>
</div>
<div class="grid" tabindex="0">
<ul class="weekdays">
<li>周日</li>
<li>周一</li>
<li>周二</li>
<li>周三</li>
<li>周四</li>
<li>周五</li>
<li>周六</li>
</ul>
<ul class="days">
<li class="row">
<ul>
<li class="day disabled">30</li>
<li class="day disabled">31</li>
<li class="day">1</li>
<li class="day">2</li>
<li class="day">3</li>
<li class="day">4</li>
<li class="day">5</li>
</ul>
</li>
<li class="row">
<ul>
<li class="day">6</li>
<li class="day today">7</li>
<li class="day">8</li>
<li class="day">9</li>
<li class="day">10</li>
<li class="day">11</li>
<li class="day">12</li>
</ul>
</li>
<li class="row">
<ul>
<li class="day">13</li>
<li class="day">14</li>
<li class="day">15</li>
<li class="day">16</li>
<li class="day">17</li>
<li class="day">18</li>
<li class="day">19</li>
</ul>
</li>
<li class="row">
<ul>
<li class="day">20</li>
<li class="day">21</li>
<li class="day">22</li>
<li class="day">23</li>
<li class="day">24</li>
<li class="day">25</li>
<li class="day">26</li>
</ul>
</li>
<li class="row">
<ul>
<li class="day">27</li>
<li class="day">28</li>
<li class="day">29</li>
<li class="day">30</li>
<li class="day">31</li>
<li class="day disabled">1</li>
<li class="day disabled">2</li>
</ul>
</li>
</ul>
</div>
</div>
</div>
|
因为层级关系较多,我这里使用scss样式,需要css的小伙伴可以使用这个sass2css转换工具。
scss:
1
2
3
4
5
6
7
8
9
10
11
12
13
14
15
16
17
18
19
20
21
22
23
24
25
26
27
28
29
30
31
32
33
34
35
36
37
38
39
40
41
42
43
44
45
46
47
48
49
50
51
52
53
54
55
56
57
58
59
60
61
62
63
64
65
66
67
68
69
70
71
72
73
74
75
76
77
78
79
80
81
82
83
84
85
86
87
88
89
90
91
92
93
94
95
96
97
98
99
100
101
102
103
104
105
106
107
108
109
110
111
112
113
114
115
116
117
118
119
120
121
122
123
124
125
126
127
128
129
130
131
132
133
134
135
136
137
138
139
140
141
142
143
144
145
146
147
148
149
150
151
152
153
154
155
156
157
158
159
160
161
162
163
164
165
166
167
168
169
170
171
172
173
174
175
176
177
178
179
180
181
182
183
184
185
186
187
188
| * {
margin: 0;
padding: 0;
outline: none;
}
html, body {
width: 100%;
height: 100%;
}
ul, li {
list-style: none;
}
body {
margin: 0;
padding: 0;
overflow: hidden;
padding-left: 20px;
}
.date-picker-group {
width: 220px;
height: 30px;
border-radius: 50px;
position: relative;
margin: 100px;
& > input {
display: block;
width: 100%;
height: 100%;
line-height: 28px;
border: 1px solid #d0d0d0;
font-size: 14px;
}
& > .trigger {
position: absolute;
top: 0;
right: 5px;
height: 100%;
width: 20px;
background: url("./date_trigger.png") no-repeat center;
background-size: contain;
cursor: pointer;
}
}
#dialog-calendar {
display: none;
font-size: 20px;
position: absolute;
background-color: #fff;
border: 1px solid #ccc;
user-select: none;
border-radius: 4px;
box-shadow: 0 0 15px -7px #000;
& > .panel-header {
text-align: center;
height: 1.5em;
line-height: 1.5em;
position: relative;
background-color: #ebebeb;
border-radius: 5px 5px 0 0;
& > .YY-MM {
display: inline-block;
font-size: 0.75em;
height: 2em;
line-height: 2em;
vertical-align: top;
}
& > .btn-control {
position: absolute;
top: 50%;
width: 6px;
height: 6px;
border: 1px solid #000;
border-top: none;
border-right: none;
transform-origin: center;
cursor: pointer;
&.prev-year {
border-width: 1px;
left: 0.5em;
transform: translateY(-30%) rotate(45deg);
&::after {
content: " ";
display: block;
width: 100%;
height: 100%;
border: 1px solid #000;
border-top: none;
border-right: none;
transform-origin: center;
margin: -3px 0 0 2px;
}
}
&.prev-month {
left: 1.5em;
transform: translateY(-30%) rotate(45deg);
}
&.next-year {
border-width: 1px;
right: 0.5em;
transform: translateY(-30%) rotate(-135deg);
&::after {
content: " ";
display: block;
width: 100%;
height: 100%;
border: 1px solid #000;
border-top: none;
border-right: none;
transform-origin: center;
margin: -3px 0 0 2px;
}
}
&.next-month {
right: 1.5em;
transform: translateY(-30%) rotate(-135deg);
}
}
}
& > .grid {
text-align: center;
& > .weekdays {
padding: 0 0.1em;
color: #808080;
border-bottom: 1px solid #dadada;
height: 1.25em;
line-height: 1.25em;
white-space: nowrap;
& > li {
float: left;
width: 2em;
margin: 0 0.2em;
font-size: 0.75em;
height: 1.667em;
line-height: 1.667em;
vertical-align: top;
}
}
& > .days {
padding: 0.1em;
& > .row {
margin-top: 0.1em;
& > ul {
height: 1.5em;
white-space: nowrap;
& > .day {
float: left;
width: 2em;
margin: 0 0.2em;
font-size: 0.75em;
height: 2em;
line-height: 2em;
border-radius: 50%;
text-align: center;
box-sizing: border-box;
cursor: pointer;
&.today {
background-color: #e7e7e7;
&:hover {
background-color: #ffa32a;
}
}
&:hover,
&.focus {
border-radius: 5px;
background-color: #ffa32a;
color: #fff;
}
&.disabled {
color: #d0d0d0;
cursor: default;
&:hover {
background-color: transparent;
color: #d0d0d0;
}
}
}
}
}
}
}
}
|
样式用em来做单位,可以通过修改根元素.calendar-panel的font-size来调整面板和字体的整体尺寸
最终呈现的效果见下图
重点来了——
首先创建一个DatePicker 类,思考一下这个类会有哪些对外开放的功能,以及哪些必须的私有变量/函数:
构造方法:传入触发元素
开放的api:进入上个月、进入下个月、进入前一年、进入后一年、显示控件、隐藏控件、设置控件位置
内部函数:设置窗体位置,更新窗体年月,更新窗体日期网格、绑定事件
于是先大概组织出这样一个结构
1
2
3
4
5
6
7
8
9
10
11
12
13
14
15
16
17
18
19
20
21
22
23
24
25
26
27
28
29
30
31
32
33
34
35
36
37
38
39
40
41
42
43
44
45
46
47
48
49
50
51
52
53
54
55
56
57
58
59
60
61
62
63
64
65
66
67
68
69
70
71
72
73
74
75
76
77
78
79
80
81
82
83
84
85
86
87
88
89
| function DatePicker (opts) {
var _this = this
this.$calendar = $('#_calendar-panel')
this.$YYMM = this.$calendar.find('.YY-MM')
this.$btnControl = this.$calendar.find('.btn-control')
this.$days = this.$calendar.find('.days')
this.today = new Date()
this.currentYear = this.today.getFullYear()
this.currentMonth = this.today.getMonth()
this.currentDate = this.today.getDate()
this.displayYear = this.currentYear
this.displayMonth = this.currentMonth
this.selectYear = null
this.selectMonth = null
this.selectDate = null
bindHandlers()
this.prevMonth = function () {
}
this.nextMonth = function () {
}
this.prevYear = function () {
}
this.nextYear = function () {
}
this.showCalendar = function () {
}
this.hideCalendar = function () {
}
this.setPosition = function () {
}
function updateDays () {
}
function update () {
updateDays()
}
function bindHandlers () {
}
}
|
先完成前面几个简单的方法,它们只用来修改DatePicker对象的属性,具体的渲染逻辑放在私有函数update中
1
2
3
4
5
6
7
8
9
10
11
12
13
14
15
16
17
18
19
20
21
22
23
24
25
26
27
28
29
30
31
32
33
34
35
36
37
38
39
40
41
42
43
44
45
46
47
48
49
50
51
52
53
54
55
56
57
58
59
60
61
62
63
64
65
66
67
68
69
70
71
72
73
74
75
|
this.prevMonth = function () {
if (this.displayMonth === 0) {
this.displayMonth = 11
this.displayYear--
}
else {
this.displayMonth--
}
update()
}
this.nextMonth = function () {
if (this.displayMonth === 11) {
this.displayMonth = 0
this.displayYear++
}
else {
this.displayMonth++
}
update()
}
this.prevYear = function () {
this.displayYear--
update()
}
this.nextYear = function () {
this.displayYear++
update()
}
this.showCalendar = function () {
this.$calendar.css({display: 'block'})
}
this.hideCalendar = function () {
this.$calendar.css({display: 'none'})
}
this.setPosition = function () {
this.$calendar.css({
left: this.$input.offset().left + 'px',
top: (this.$input.height() + this.$input.offset().top + 5) + 'px'
})
}
function update () {
_this.$YYMM.html(_this.currentYear + '年' + (_this.currentMonth + 1) + '月')
updateDays()
}
|
updateDays是我们渲染日期面板的核心方法,先理一下逻辑:
① 首先我们要获取当前需要展示的月份的天数(dayNum)以及该月第一天是星期几(startWeekday)
② 如果不是星期日(0)则获取上个月最后一天的日期(endDateOfLastMonth),将该星期用上个月的最后 startWeekday 天填满
③ 循环填充本月的所有日期,并记录最后一天是星期几(weekday)
④ 如果不是星期六,则从1号开始填完本周剩余 7 - weekday -1 天
按照以上的逻辑,完成了updateDays函数
1
2
3
4
5
6
7
8
9
10
11
12
13
14
15
16
17
18
19
20
21
22
23
24
25
26
27
28
29
30
31
32
33
34
35
36
37
38
39
40
41
42
43
44
45
46
47
48
49
50
51
|
function updateDays () {
var weekday, displayDate
var rowCount = 1
var gridHtmlArray = ['<li class="row"><ul>']
var endDateOfLastMonth = new Date(_this.displayYear, _this.displayMonth, 0).getDate()
var startWeekday = new Date(_this.displayYear, _this.displayMonth, 1).getDay()
for (weekday = 0; weekday < startWeekday; weekday++) {
displayDate = endDateOfLastMonth - startWeekday + weekday + 1
gridHtmlArray.push('<li data-day="' + displayDate + '" class="day disabled">' + displayDate + '</li>')
}
var dayNum = new Date(_this.displayYear, _this.displayMonth + 1, 0).getDate()
for (displayDate = 1; displayDate <= dayNum; displayDate++) {
if (displayDate === _this.todayDate && _this.displayMonth === _this.todayMonth && _this.displayYear === _this.todayYear) {
gridHtmlArray.push('<li data-day="' + displayDate + '" class="day today">' + displayDate + '</li>')
}
else if (displayDate === _this.selectDate && _this.displayMonth === _this.selectMonth && _this.displayYear === _this.selectYear) {
gridHtmlArray.push('<li data-day="' + displayDate + '" class="day focus">' + displayDate + '</li>')
}
else {
gridHtmlArray.push('<li data-day="' + displayDate + '" class="day">' + displayDate + '</li>')
}
if (weekday === 6 && displayDate < dayNum) {
gridHtmlArray.push('</ul><li class="row"><ul>')
rowCount++
weekday = 0
}
else {
weekday++
}
}
var fromDate = 1
for (weekday; weekday < 7; weekday++) {
gridHtmlArray.push('<li class="day disabled">' + (fromDate++) + '</li>')
}
gridHtmlArray.push('</ul></li>')
_this.$days.html(gridHtmlArray.join(''))
}
|
最后绑定事件:
1
2
3
4
5
6
7
8
9
|
function bindHandlers () {
_this.$calendar.on('click', '.prev-month', function () { _this.prevMonth() })
_this.$calendar.on('click', '.next-month', function () { _this.nextMonth() })
_this.$calendar.on('click', '.prev-year', function () { _this.prevYear() })
_this.$calendar.on('click', '.next-year', function () { _this.nextYear() })
}
|
后面待补充的功能还有很多,面板定位,dom元素创建,触发事件,事件格式化,jquery封装,挖个坑先~
 完整代码戳这里
在线演示一、在线演示二